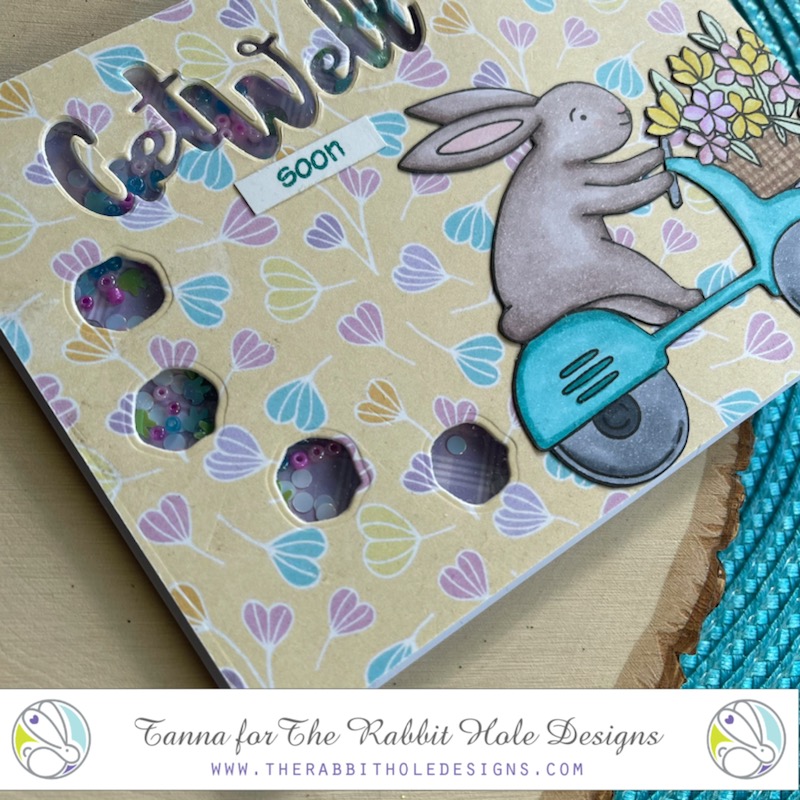
Hello Everyone!! It’s release day 1 for the March release for TRHD!! Are you as excited as I am?? There are 3 days of release fun and inspiration & The Rabbit Hole Designs LLC. is giving away one $25.00 savings voucher to a randomly chosen commenter from all 3 days on the TRHD blog posts. Commenting closes at 11:59pm on 02/25/2021 with the winner being announced on TRHD blog on 02/26/2021. Many of the contributors in the lineup have 25.00 savings vouchers to give away, so make sure to visit each stop along the way & comment for a chance to win.
Today I’m using the Spring Delivery stamp set, and the Spring Floral #1 6×6 paper pad to create my fun & easy shaker card. The Paper pad has 24 double sided sheets, 3 each of 16 designs. They were all so fun and full of spring, I had a hard time deciding which to use!!
Now I didn’t have an exhaust puff die.. does anyone?? So, to see what I used to create the exhaust, and how I made the card, Stay tuned for my YouTube video coming on March 6th where you can see this card and another made with other products from this release!!
** Links you see may be affiliate links. Affiliate links are used at no extra cost to you , and allow us to continue to bring you free content and inspiration. Thank you for your support!!**
Hello everyone!! I know it’s been a very long time since I posted on the blog. Writing is not my strong suit, but I am going to try to be better at it, it’s one of my crafty New Years resolutions!! We are going to keep this a simple explanation, and for a more detailed look at how I put the cards together you can head on over to my channel and watch the video here: https://www.youtube.com/watch?v=GHjMUvU_r8c&feature=youtu.be
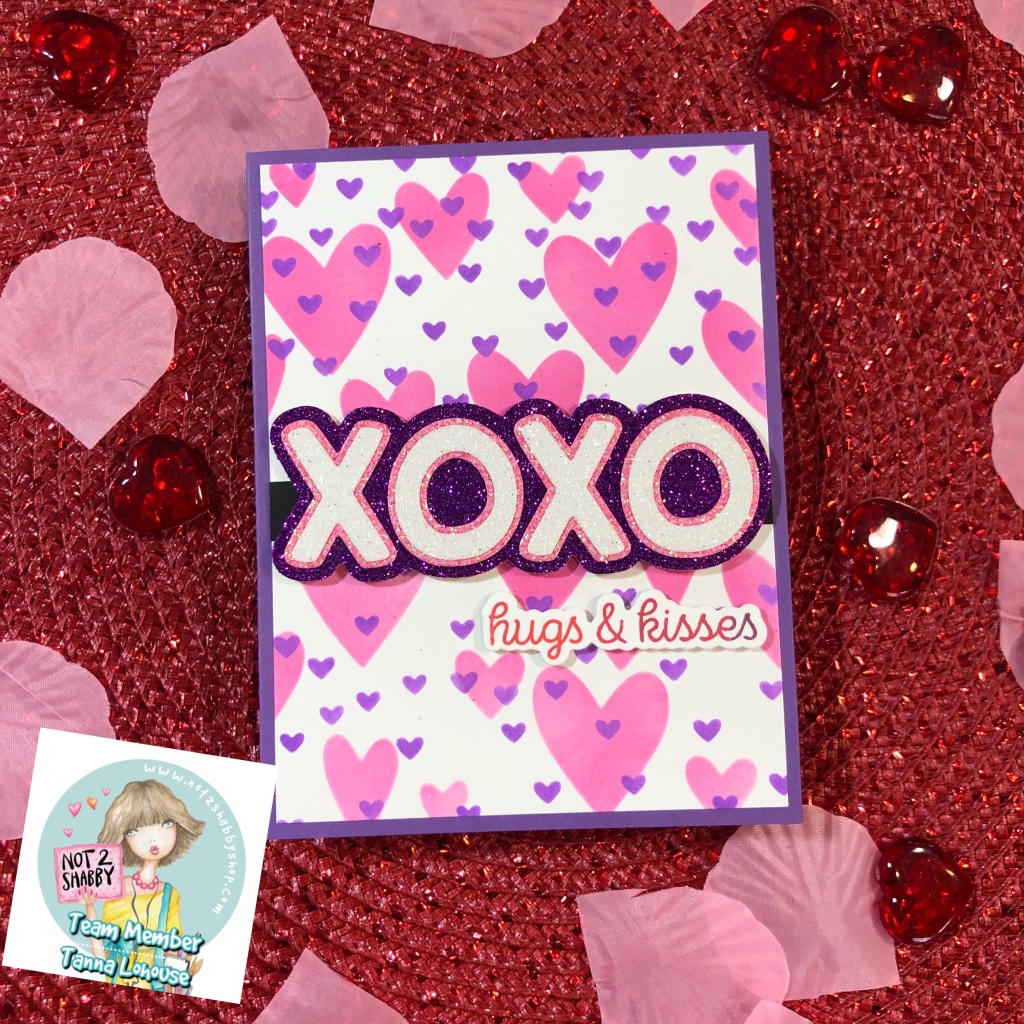
second card, using the xoxo stamp set on the background, with some heat embossing.
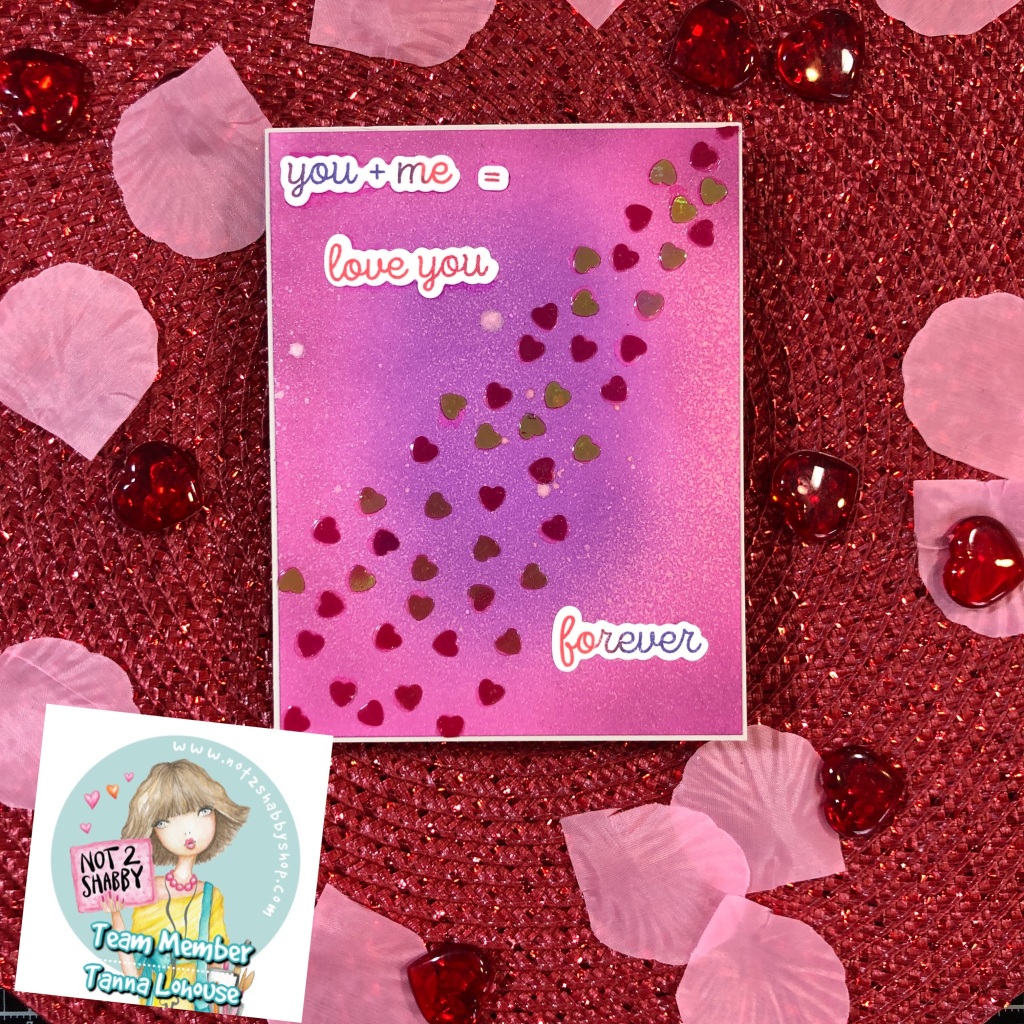
The basis for all three of these cards ended up being ink blending. I used a combination of stencils for two of them, and an entire ink blended panel for the third one. I also sprayed the ink blended panel with some tattered angels wedding pink glimmer mist, but first it sprayed me!! (blooper in the video). I used the XOXO Honeycuts as the sentiment for one card, and the XOXO stamp set on the other two with a smaller xoxo die I picked up from A.C. Moore a while back.
this ink blended and lightly spritzed background gave me some trouble but turned out beautiful I think.
With some strategically placed heart sequins, and some novo crystal glaze, I finished up this last card and kept it fairly simple. I wanted that background to speak for itself. I hope you guys enjoy these cards, and find some valentine inspiration, don’t forget to check out the video!! Happy Valentines Day!!
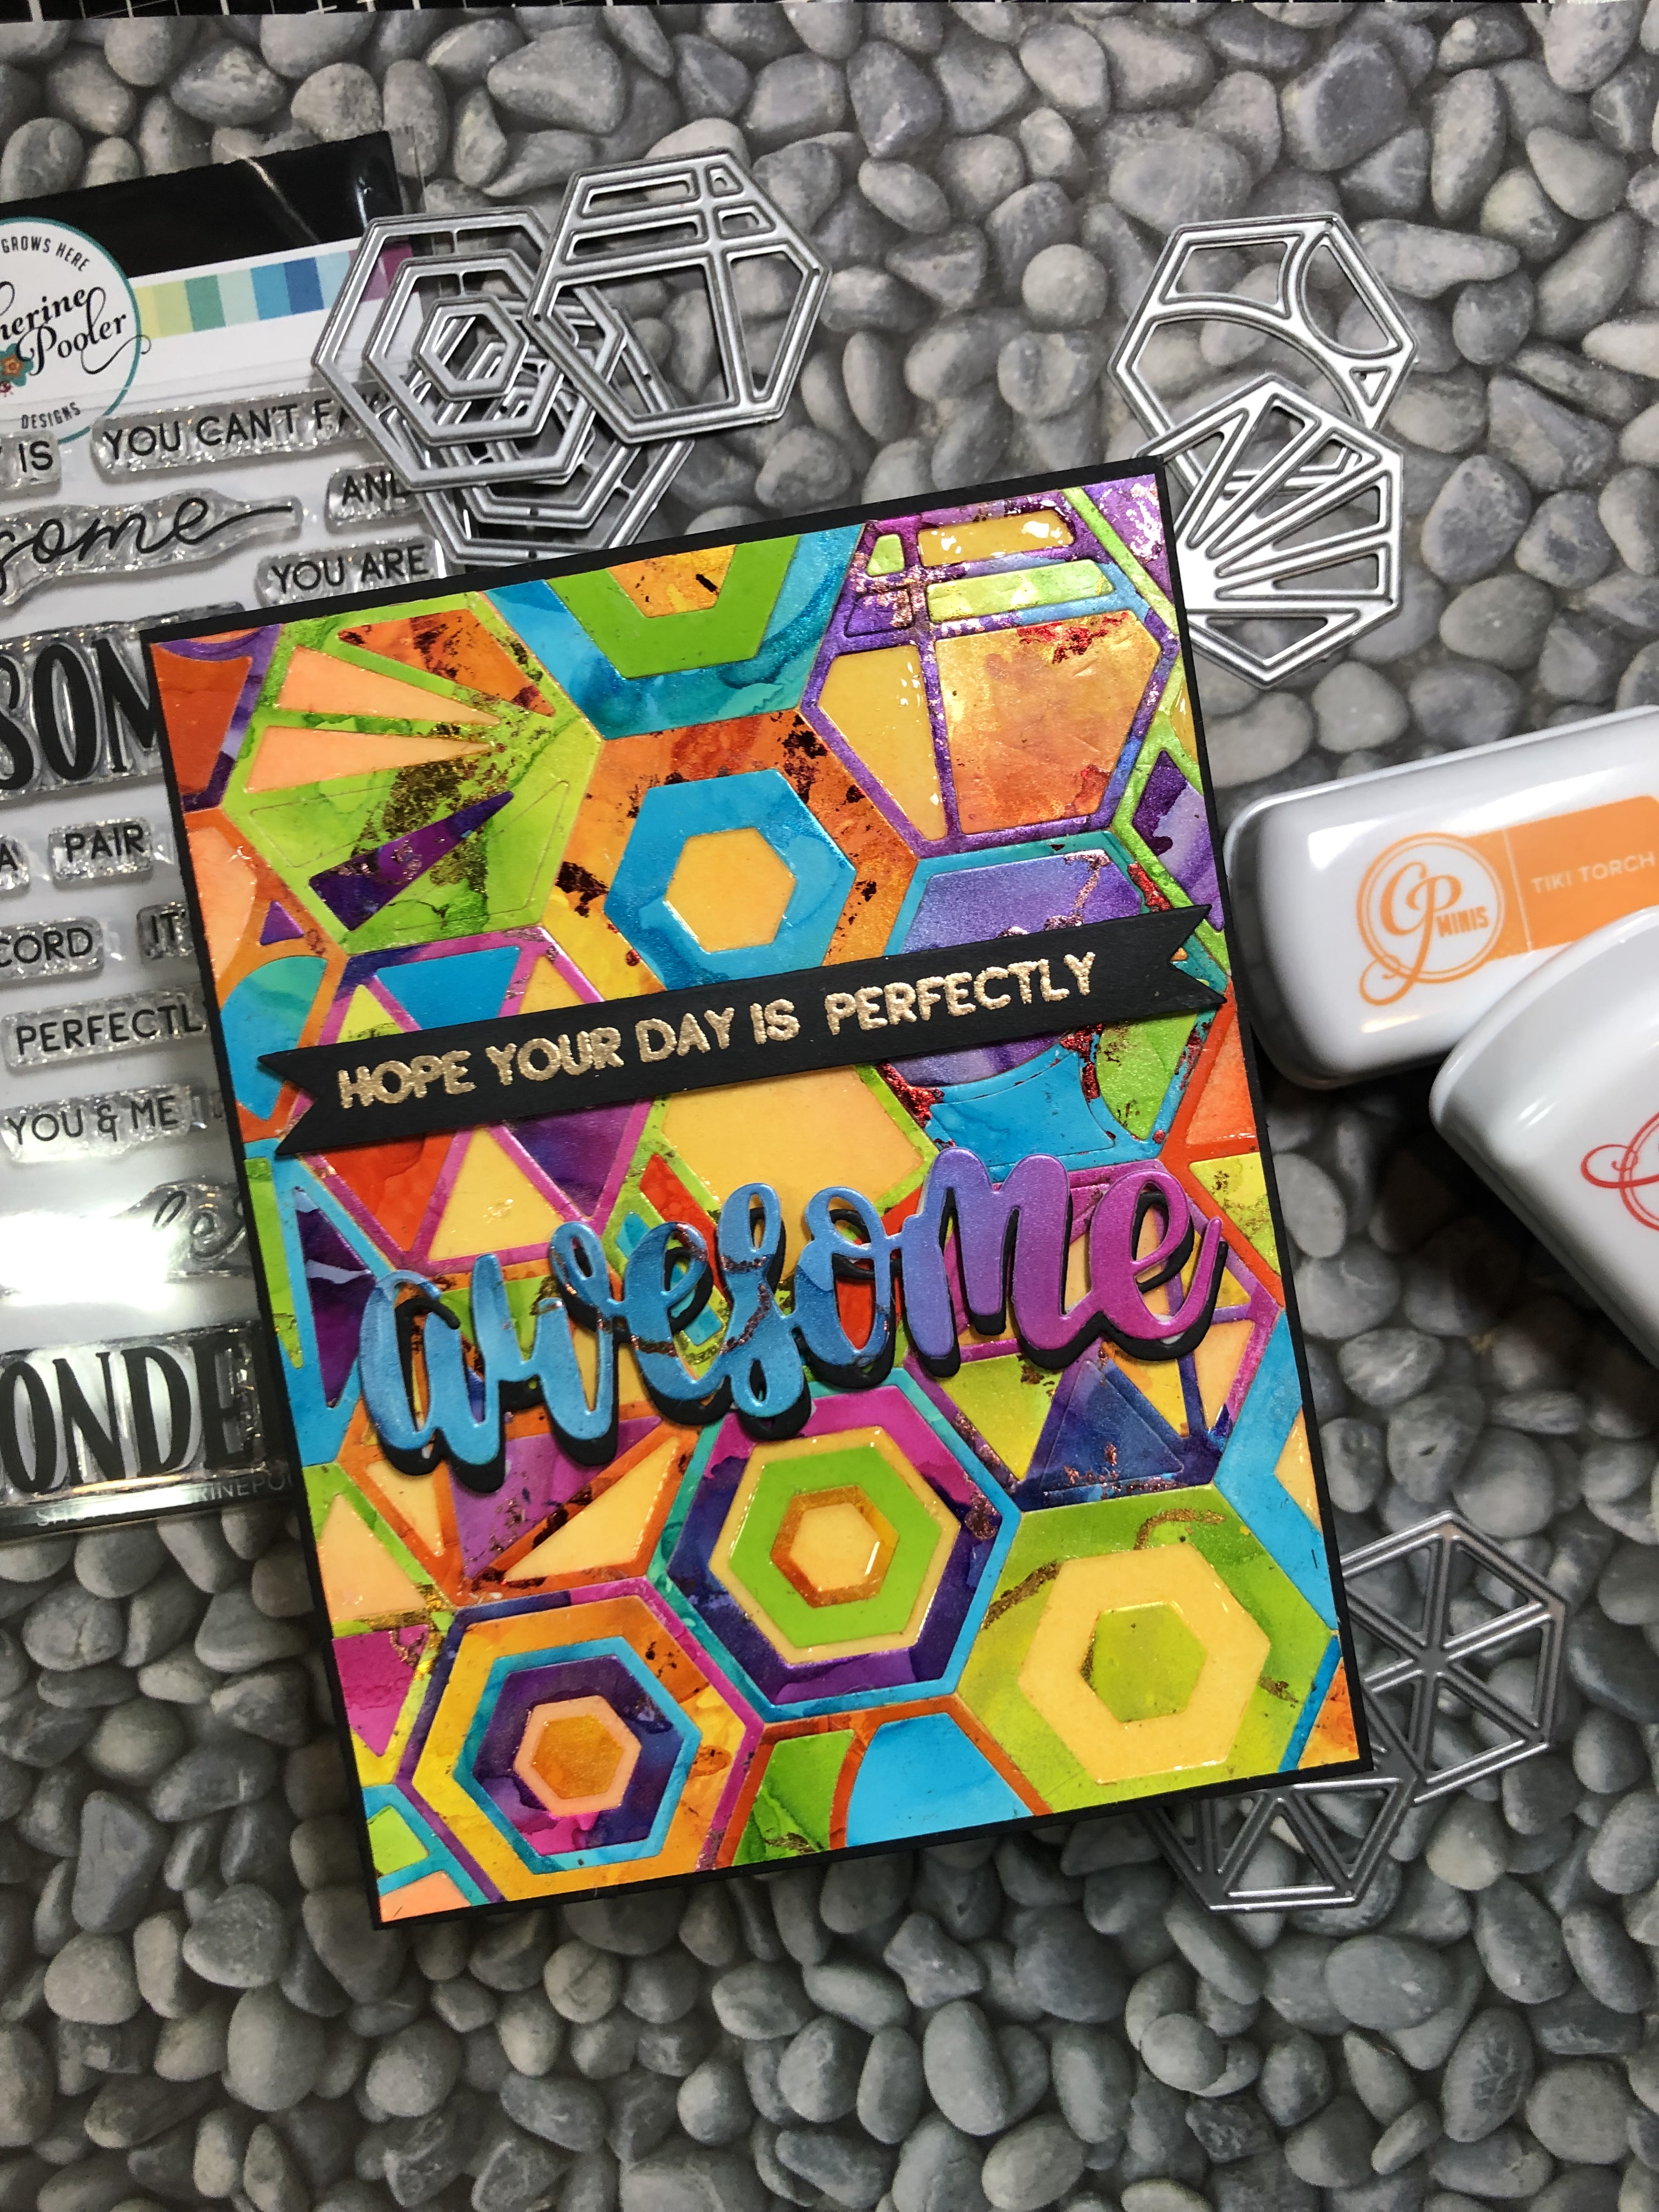
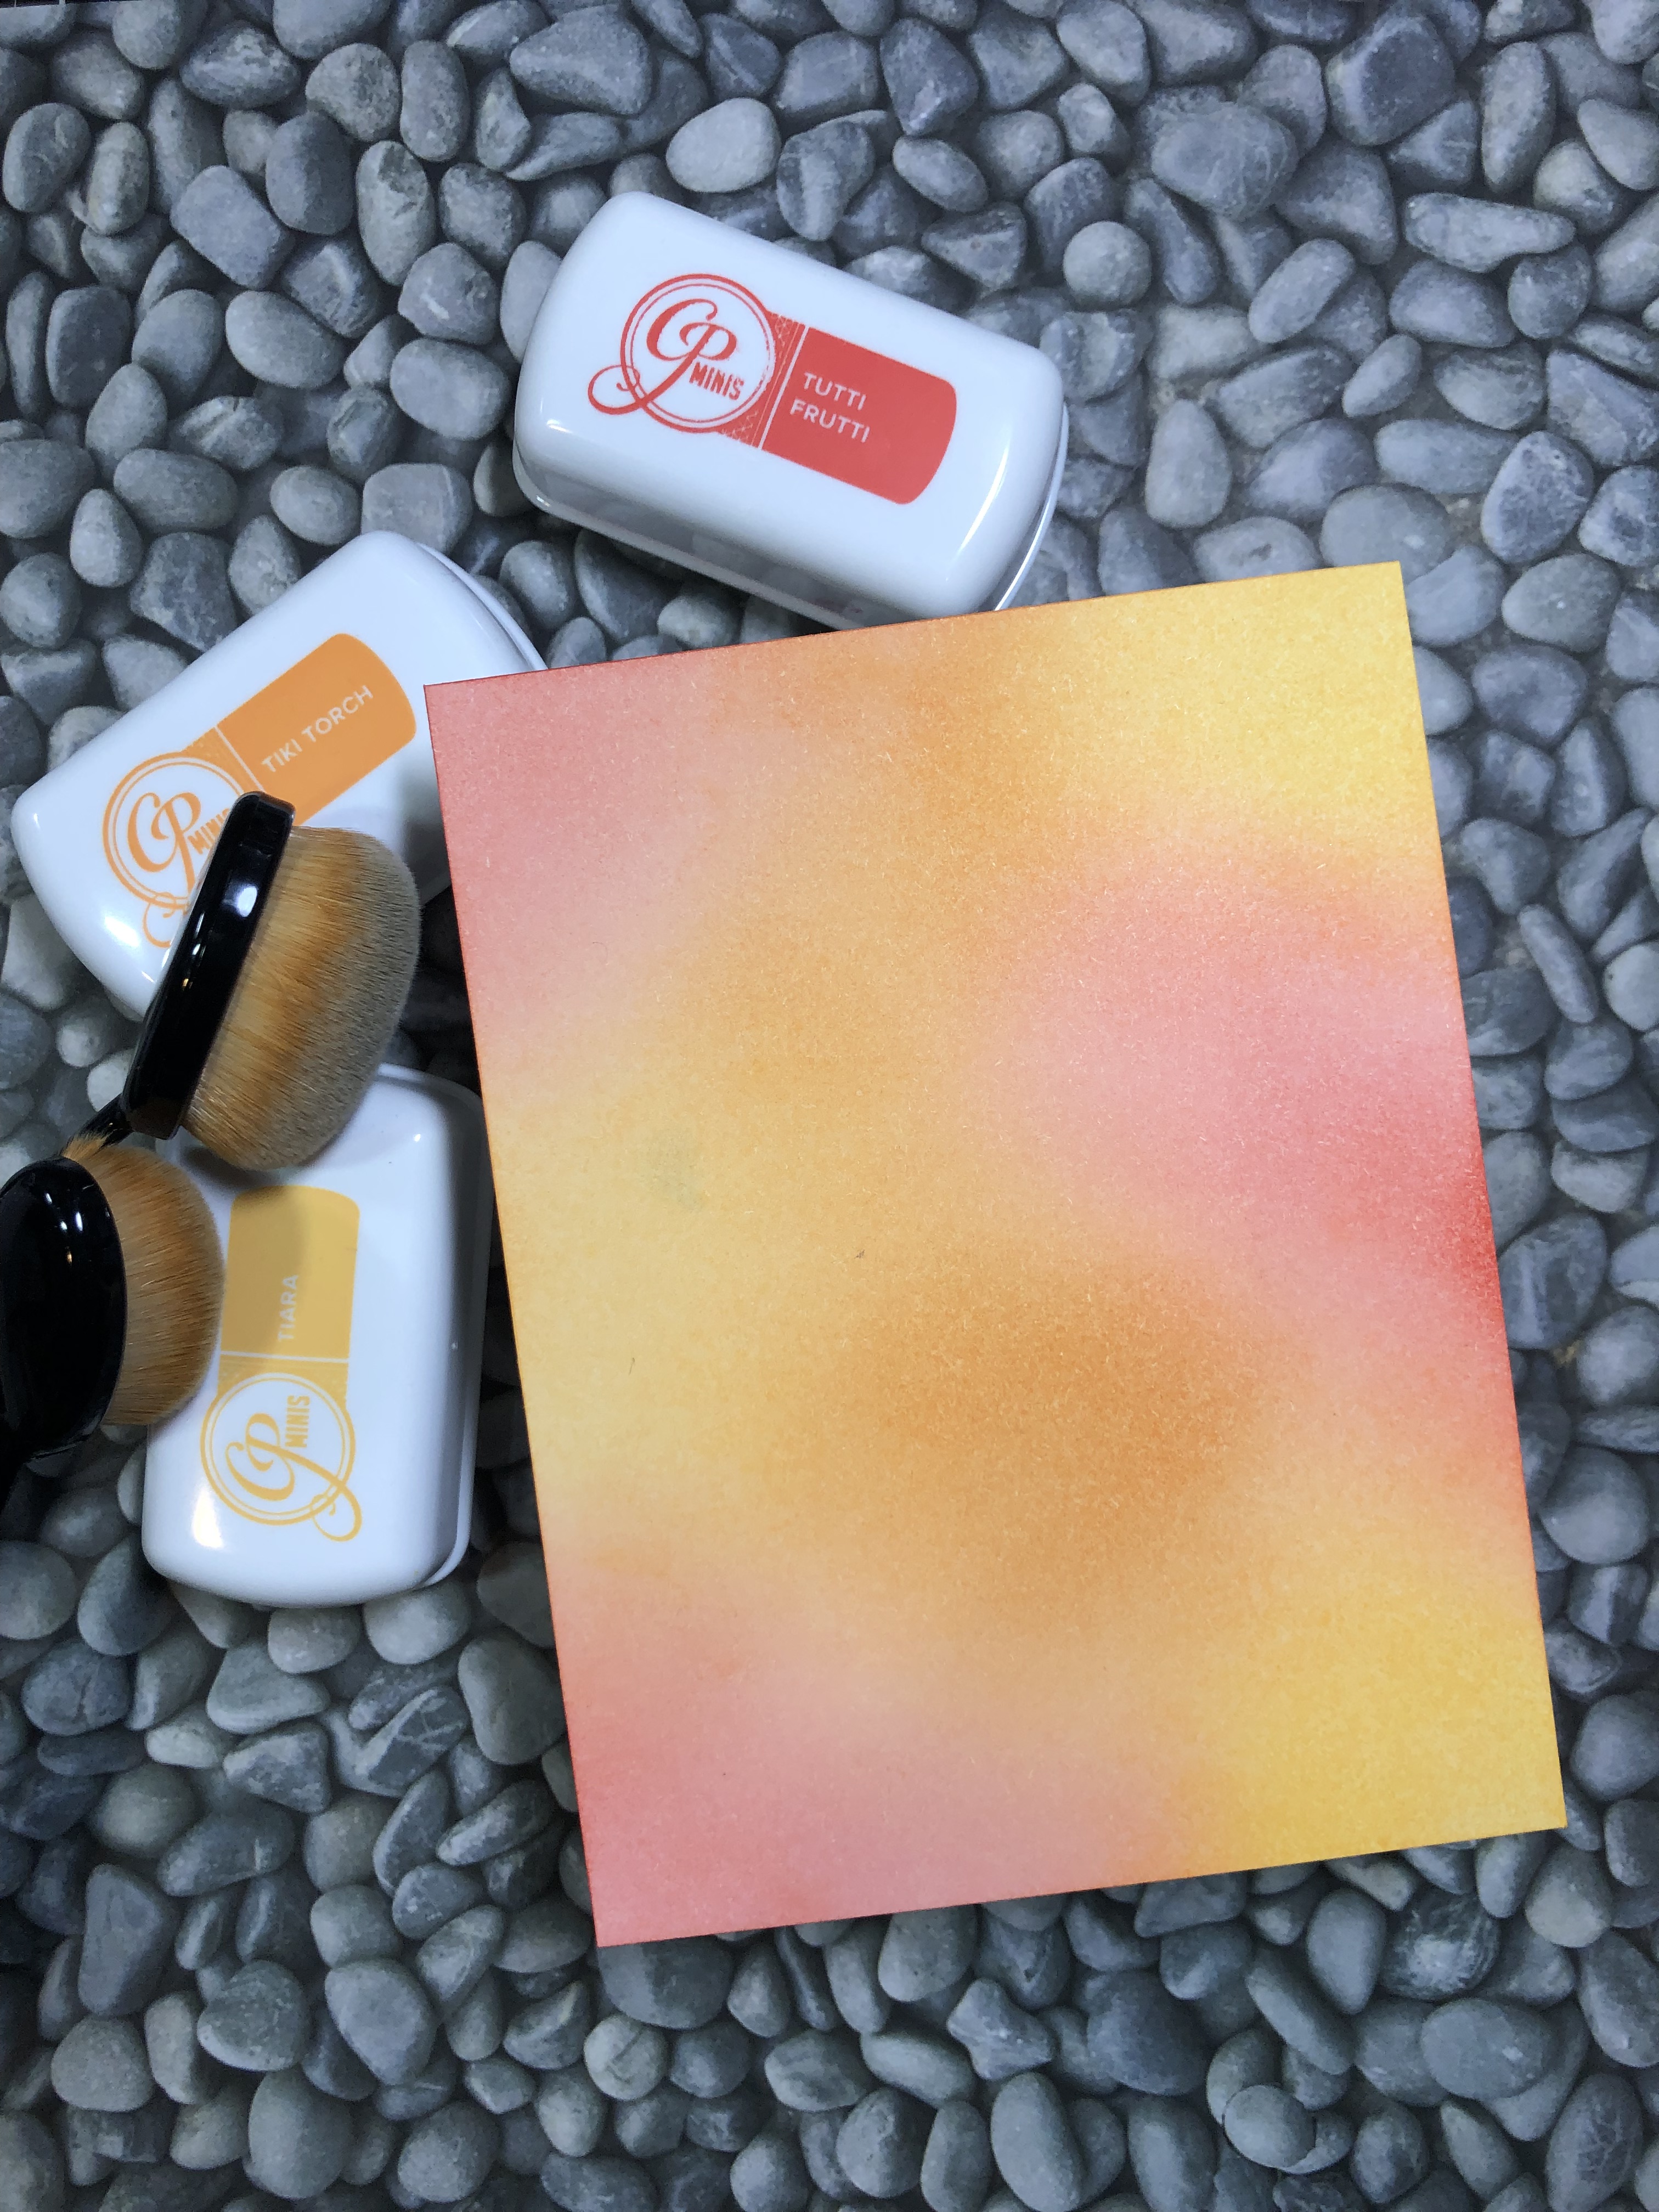
Hey guys and gals!! I’m so happy that you have decided to read along and be a part of my very first blog. Today I wanted to share a card I made using Catherine Pooler’s cabana tiles dies and a lot of different colors of Ranger alcohol inks, including some of the new pearl colors. I took enough pictures to fill a shopping cart, so you guys should have no problem following along.
ink blended background
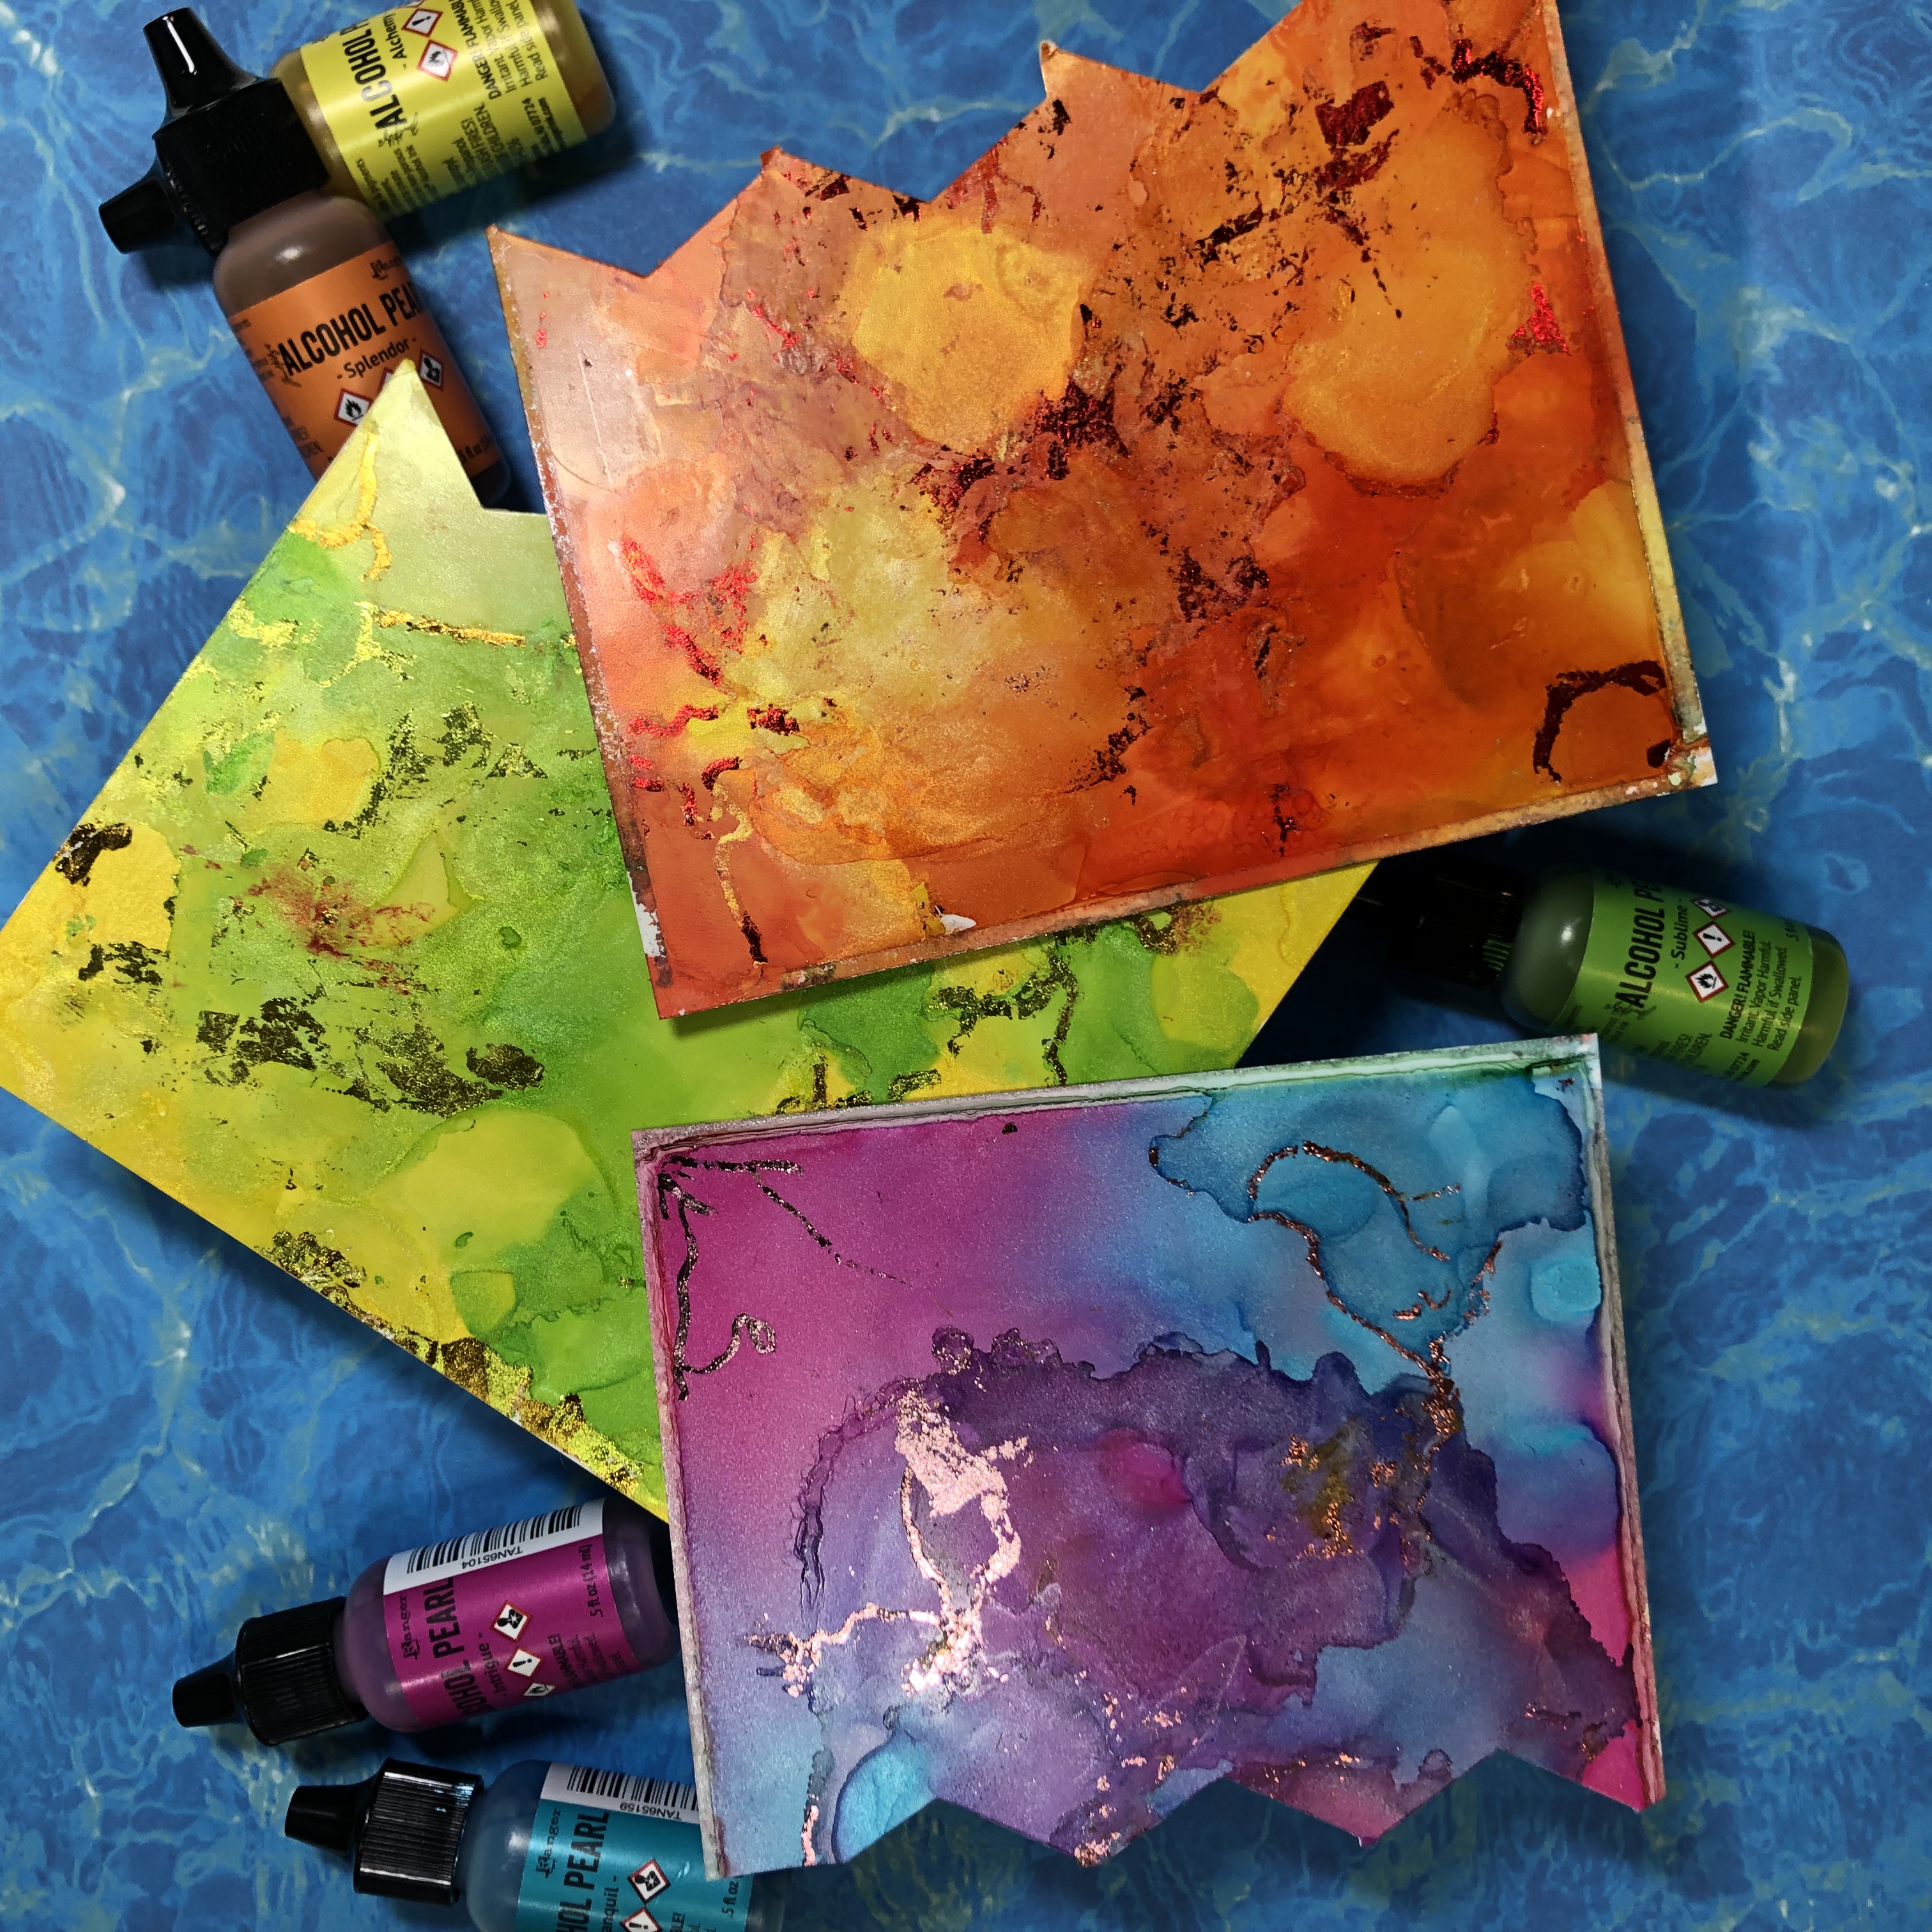
I started with a piece of Bristol smooth cardstock cut 4 1/4 by 5 1/2 ( we will trim this down later) I used some blending brushes I bought on amazon, and Catherine Pooler inks in the colors Tutti Frutti, Tiara, and Tiki Torch. My blending was meant to be haphazard… right now it just looks blotchy to me. (human error, yep this human, right here..) I left it alone after I achieved some decent blending where the colors mix.. the blotchiness didn’t matter for this card as most of it will be covered. Next I took some alcohol inks in lots of bright bold ( I was thinking tropical) colors and made a few panels to let dry for the next step.
alcohol ink backgrounds
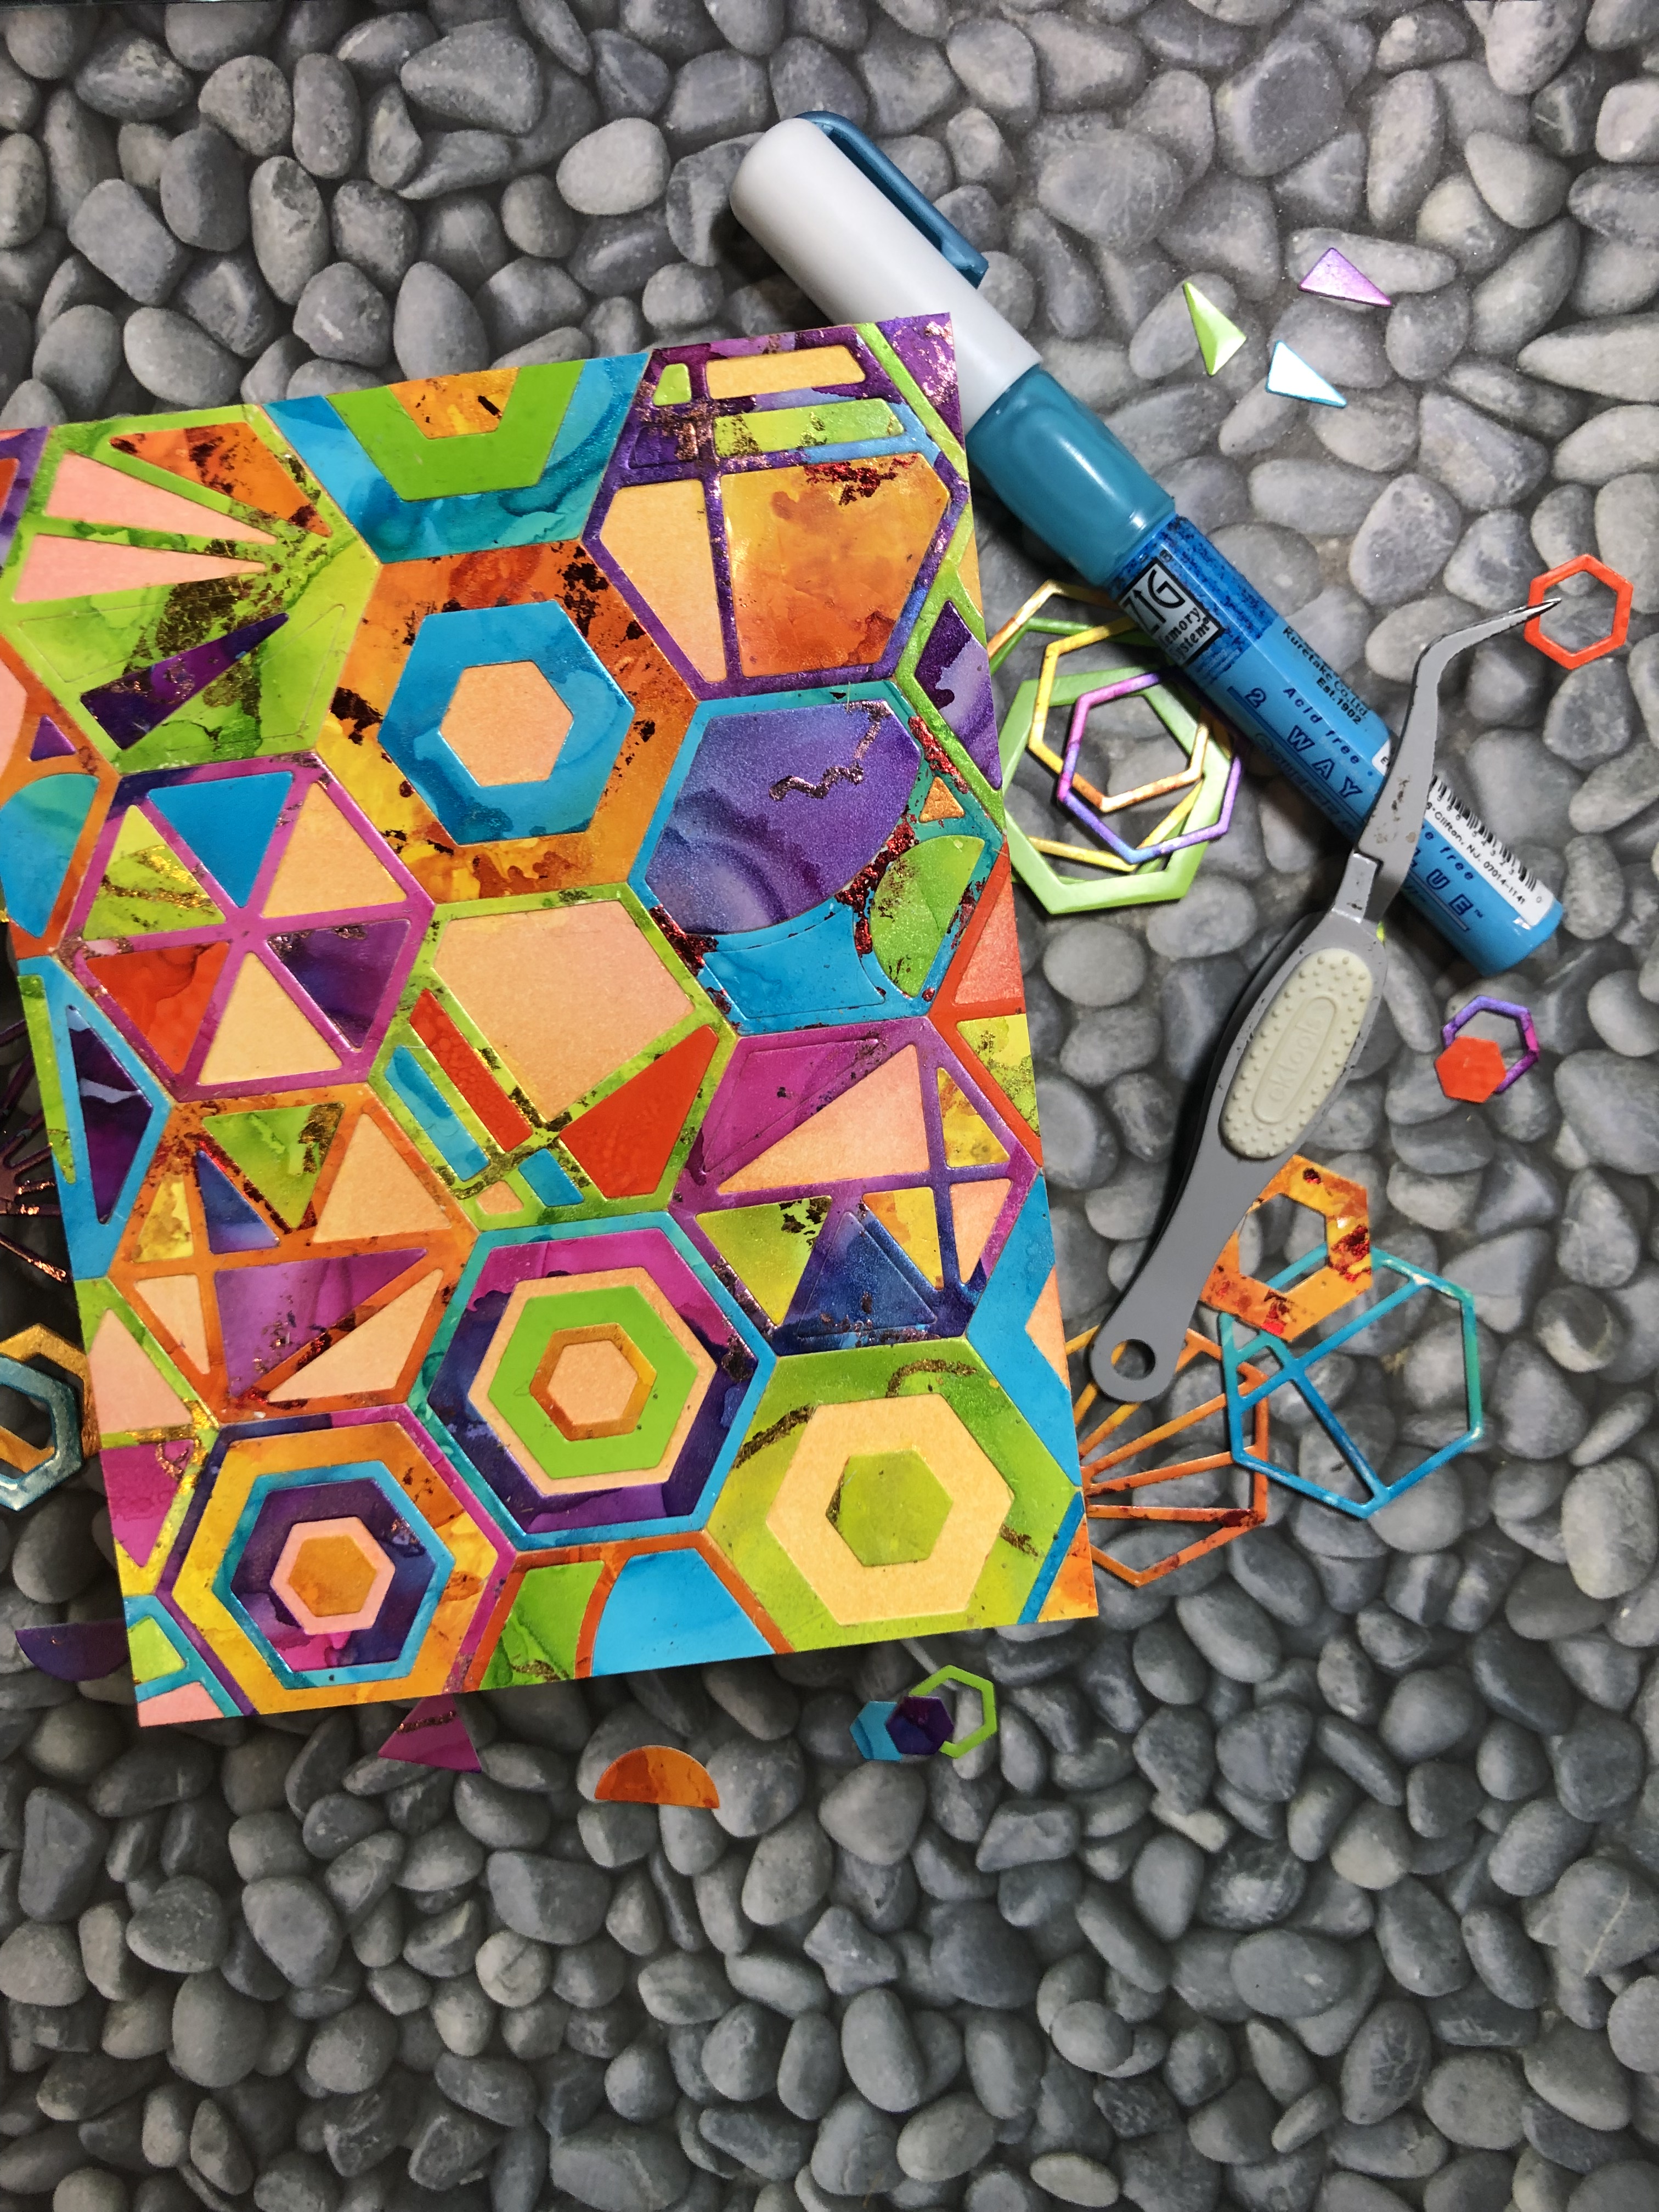
Now I know I had fun with those backgrounds, but the real fun is about to begin!! The cabana tiles dies come with 7 differently designed tiles, all in a hexagon shape. Since I couldn’t decide which to cut out of what color; I decided to cut out 7 of each color. Man that’s a lot of pieces!! If you aren’t into puzzles I suggest keeping this part a little more simple. To the left here are the panels I inked up; and below are the beginnings of an intricate tile dance!! Whew!! let me tell you though, those beauties were worth it!! They turned out beautiful!!
After I cut all the tiles out , I arranged them in a SAFE, I repeat SAFE place until I used everything I needed. There are some small pieces in a couple of these designs.. you don’t want to lose a crucial piece! Below you can see how I just start placing the outer layer of the hexagon down onto the card base, making sure to line them up bottom to top side to side as we get further into
the layout of the card front. I continued in this manner, alternating colors, in no real pattern.. just trying to make sure two of the same color weren’t touching. When the entire card was covered, I used pieces to insert along the edges or cut them in half to use in more than one spot along the edge.
Then it was time to start placing the design pieces of the tiles. I used a zig two way glue pen, one of my go to adhesives. There are many ways to do this; going with their proper pieces and or color, or mixing them up to name a couple. I chose to mix up their colors, trying not to plan too much… putting proper pieces where they belong but also throwing in different colors and also leaving some blank to show off some of the blended background I worked so so hard on ( come on guys, I worked a little bit at least ). The picture to the right shows the card front with almost all it’s pieces placed.
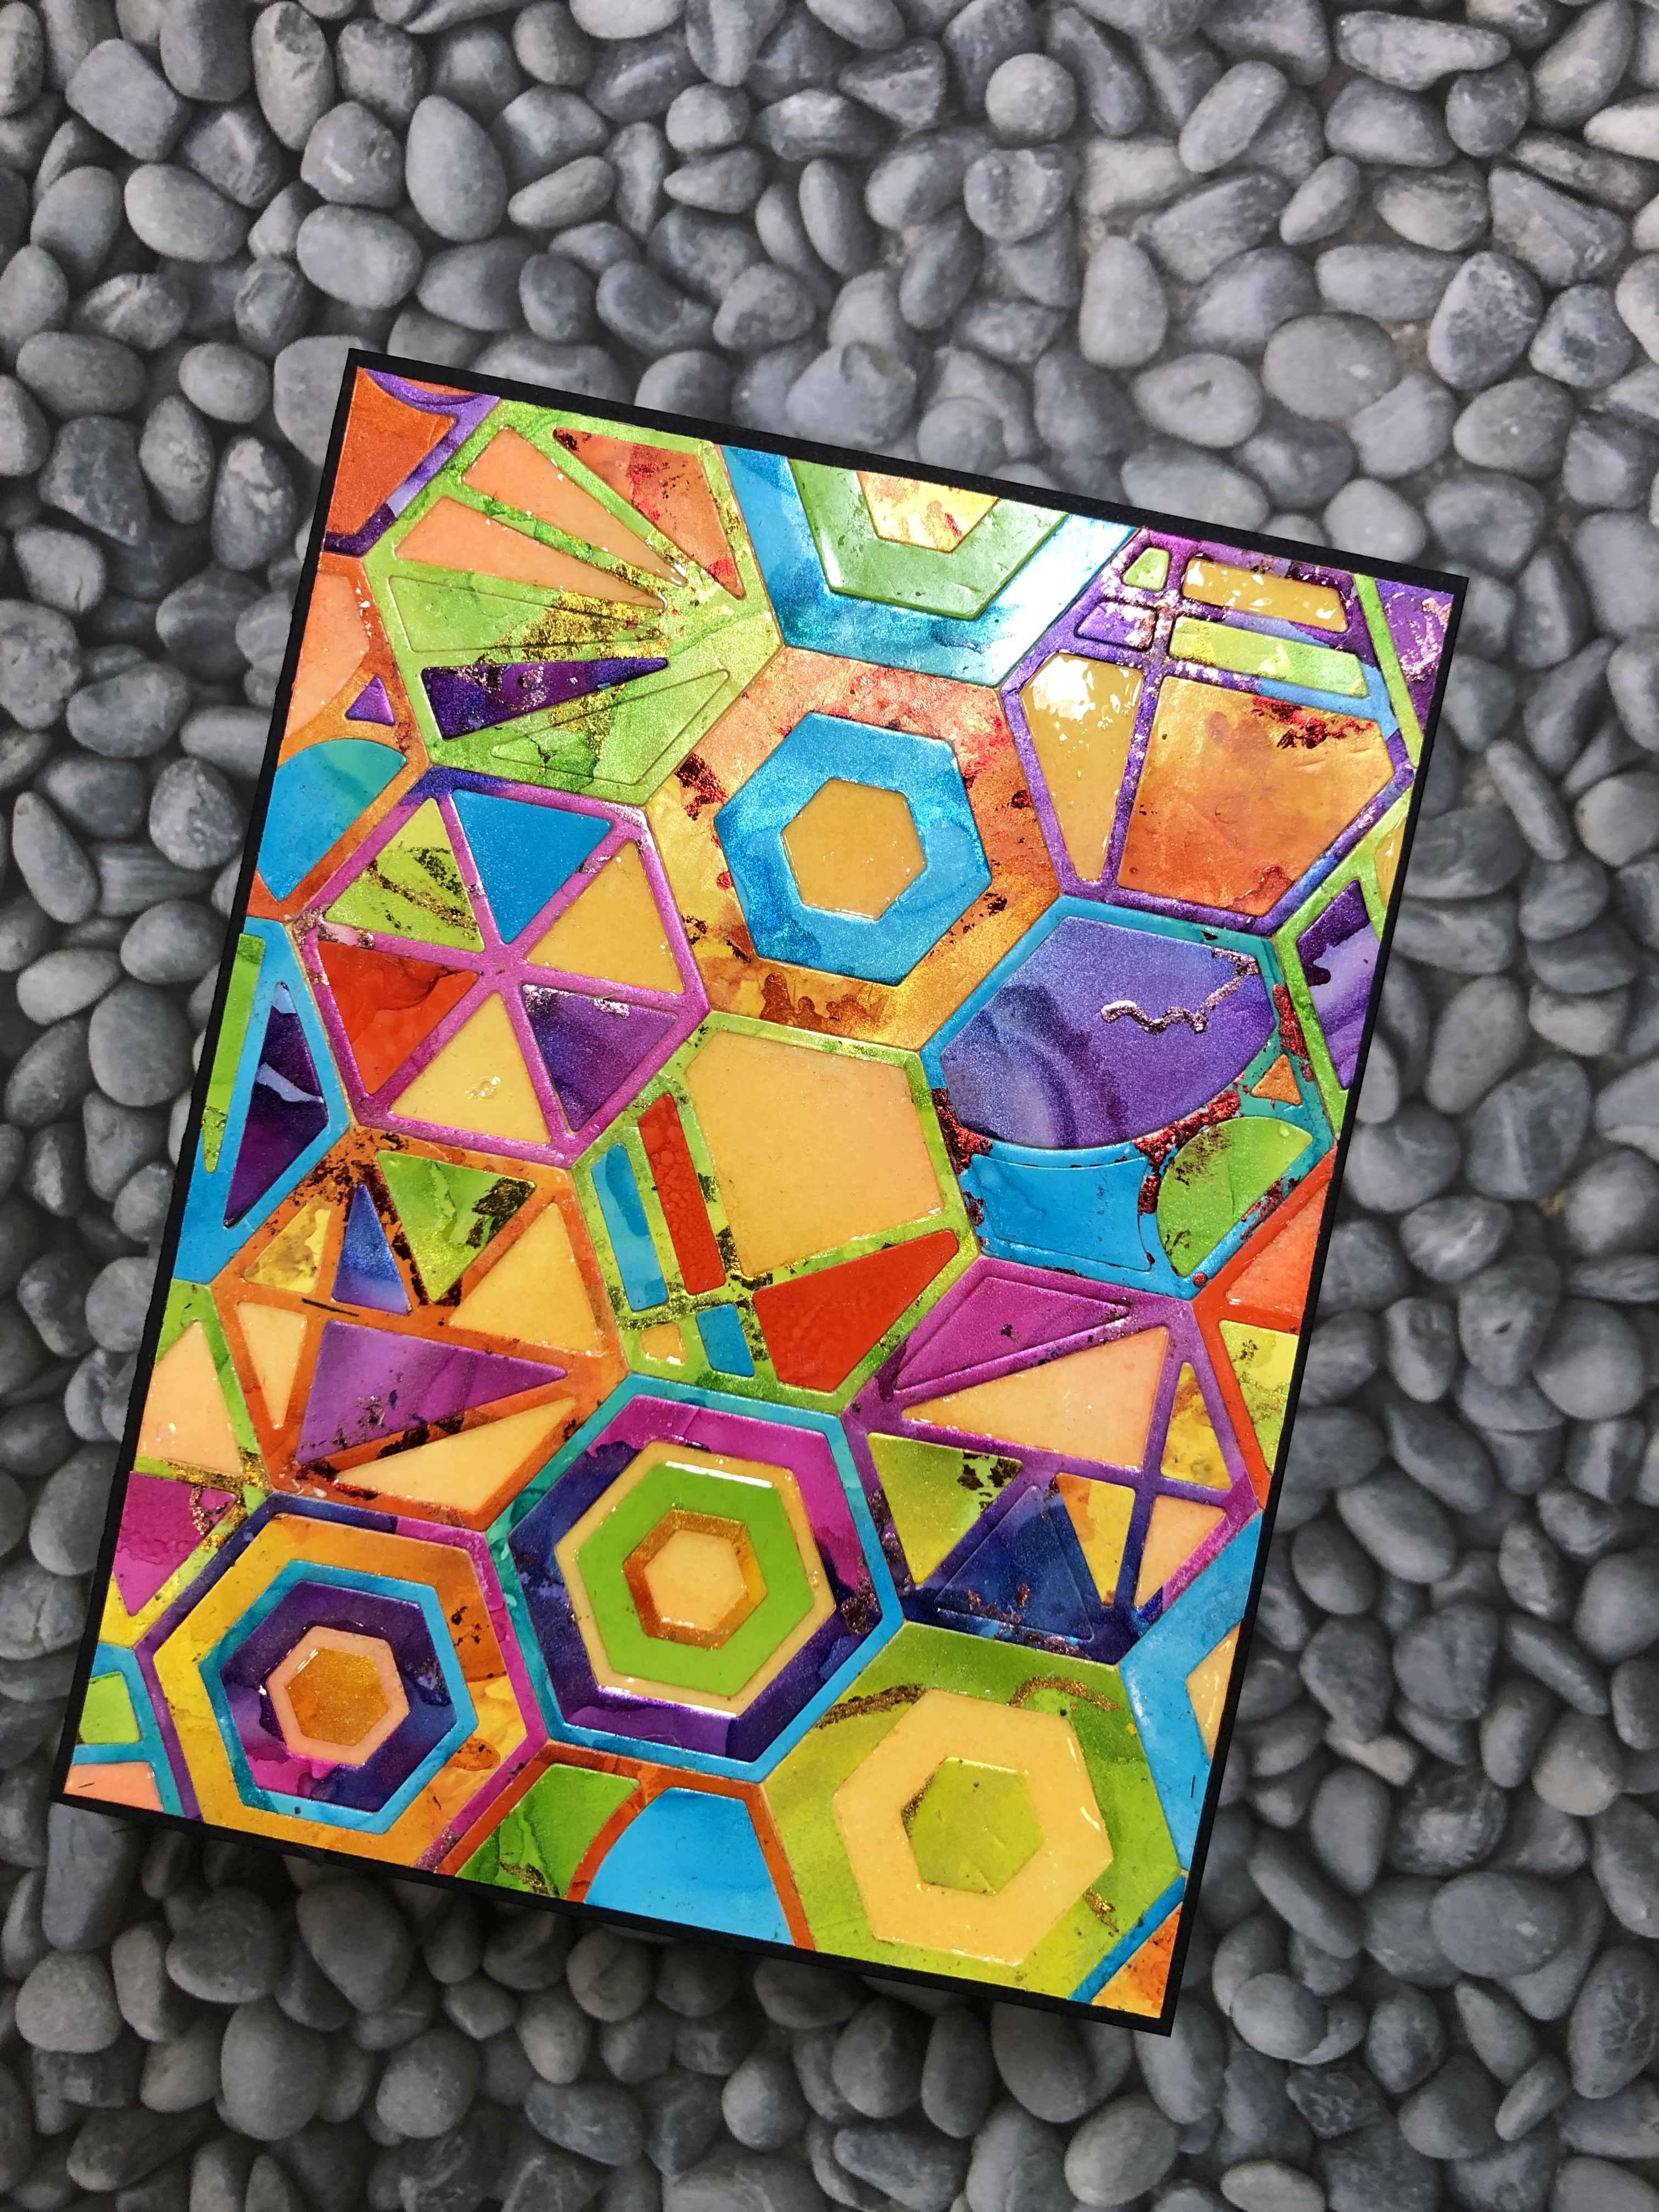
To the left you see the finished card front. I have left some empty spots to show off the ink blending and filled them in with Glossy accents using a light hand. I wanted those areas to shine, but also keep the card somewhat level. it was at this point right before the glossy accents that I chose to trim the panel down to 4″ by 5 1/4″ and matte it on a black card base.
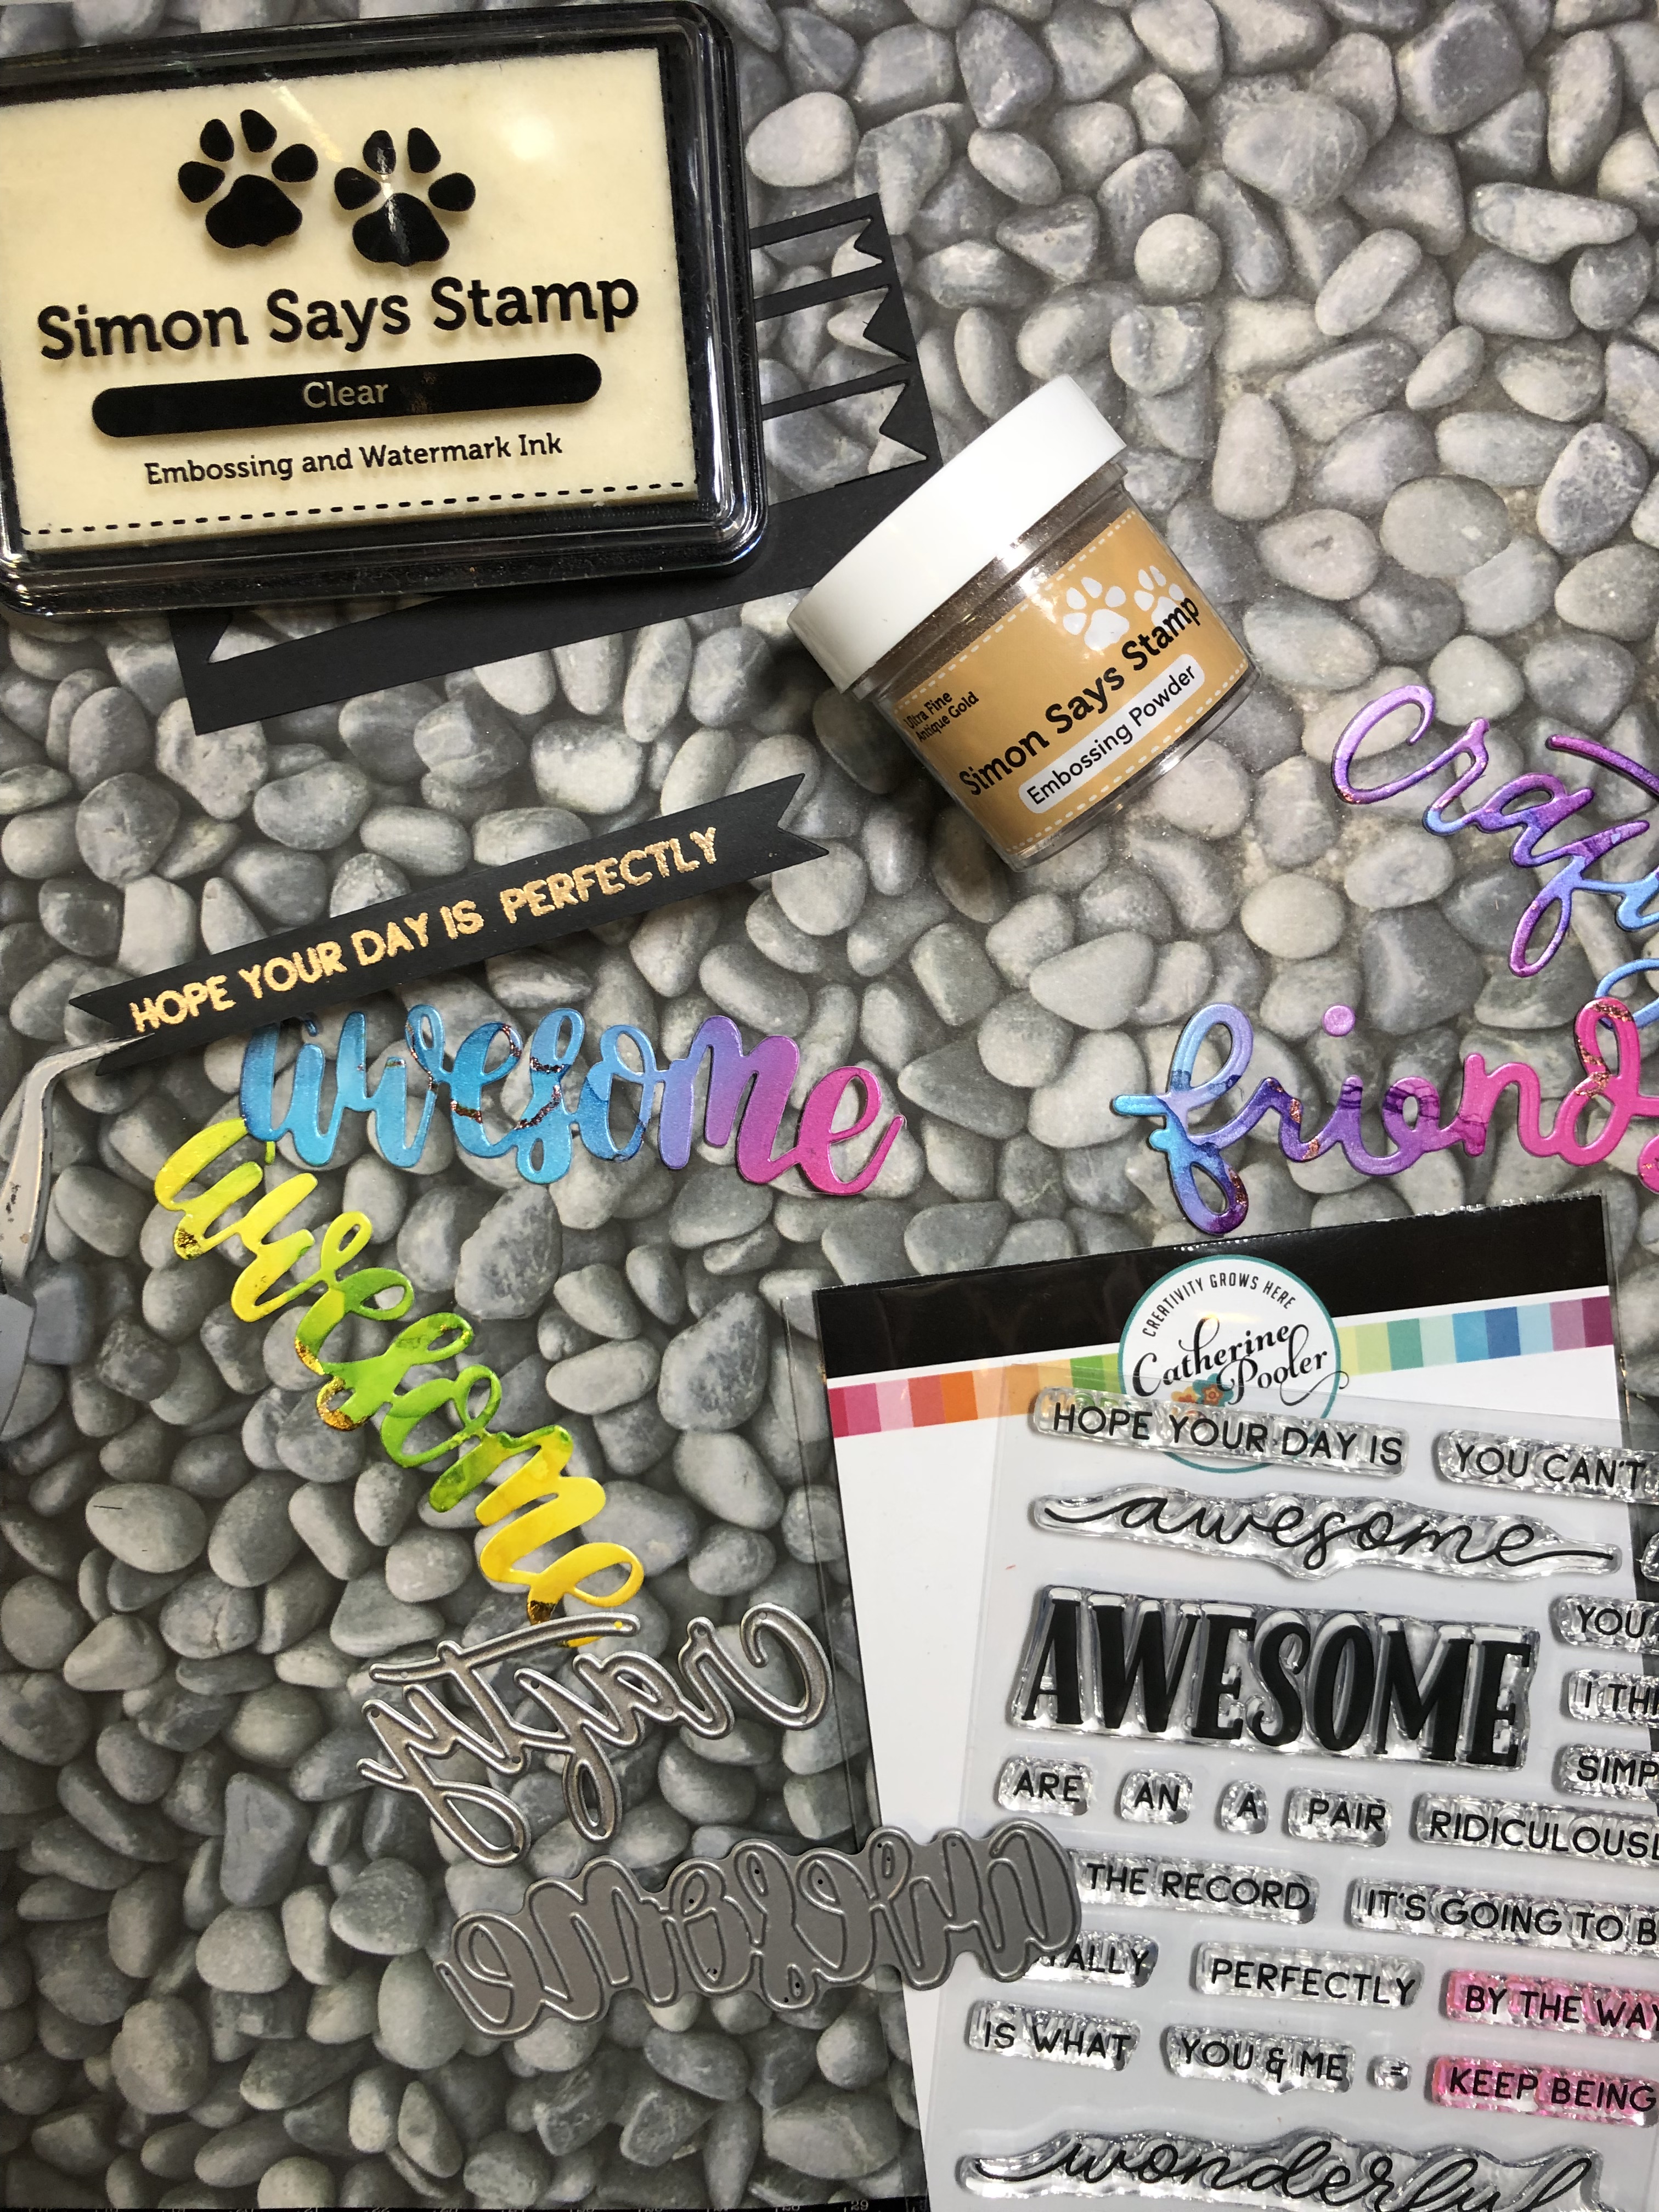
While waiting for the light coat of Glossy Accents to dry, I pulled out the Awesome and Wonderful stamp set from Catherine Pooler and the coordinating Awesome die from my stash (along with a few other sentiments I was thinking of using, I always seem to give myself too many choices!) And Die cut out the word Awesome from some of the leftover alcohol ink panels. I took a combination of sentiments from the stamp set and stamped out “Hope your day is perfectly” on a strip of black cardstock,
( that little teeny tiny strip was cut using the Neat and Tangled skinny strips dies and it’s just adorable isn’t it??!) Back to the blog, ahem… >>cough<<. So I used Simon Says stamp embossing pad to stamp that out and some Simon Says Stamp antique gold embossing powder.. I wanted to use gold so that the gold foiling that was on some of the alchol ink panels would really come alive. I also cut another “awesome” out of black cardstock and glued it underneath the colored one so it looked like a shadow. then I popped both the sentiment strip and the word awesome up on some foam tape and tacked those suckers to my card.
Phew!!! I did it guys! I completed my very first blog post. I’m so proud I could pat myself on the back!! ( Look ma, no hands!) Okay since i’m still getting the hang of this, i’m going to skip the supply list just this one time. If you guys need to know anything specific or know about a specific product. please leave a comment below. If for some reason (reason being I probably don’t know what i’m doing) there’s nowhere to leavc a comment I will leave links to my youtube channel and my Instagram and you can hit me there.!! ( like literally hit me,well ok ok not really but hey it was worth a shot.) Thank you so much for reading along and until next time, have yourself a little crafty adventure!